2004 Cadillac XLR: XM Antenna Installation on XLR
Estimated Reading Time: 2 MinutesWhen a 2004 Cadillac XLR is ordered with the optional XM radio, the antenna is shipped loose. It must be installed before delivery of the vehicle (at customer request). A detailed instruction sheet is supplied with the antenna kit. Here are some highlights.
TIP: Install protective coverings over the rear compartment and adjacent panels. The folding top must be in the lowered position and the compartment lid open.
On all XLR models, an AM/FM antenna ground plate is attached to the underside of the rear compartment lid. A supplemental ground plate/template is supplied with the XM antenna. It must be positioned and installed before the XM antenna is installed (fig. 10).
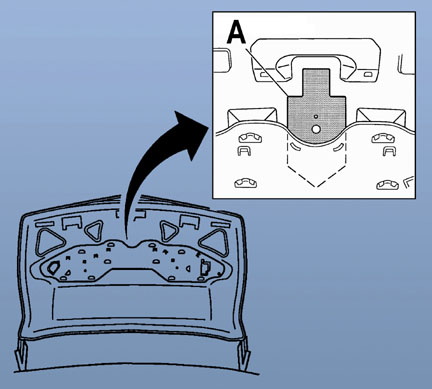
A Template
TIP: For the first several months of production, it will be necessary to temporarily remove the large ground plate from the underside of the rear compartment lid. In later production, it will be reshaped and can be left in place. The instruction sheet provided with the antenna kit will reflect the appropriate steps.
The XM antenna ground plate/template aligns to a recessed feature in the rear compartment lid. It serves as a template to mark the locations for two pilot holes on the underside of the rear compartment lid.
A strip of masking tape is used to protect the exterior surface of the compartment lid while the pilot holes are enlarged as instructed.
TIP: After the pilot holes are drilled and enlarged, remove masking tape and drilling remnants and use GM RTV silicone rubber sealant (12345739) to seal the raw edges of the holes.
The XM antenna ground plate/template is equipped with an adhesive material. Peel the backing and install the plate to the underside of the compartment lid.
TIP: When the backing is removed, be sure the diecut discs are also removed from the mounting holes.
Then follow the instructions to install the XM antenna, fasteners, and wiring.
On early models, follow SI procedures to reinstall the large ground plate to the rear compartment lid. On later models, this step will not be necessary.
Then use your Tech 2 to verify that the proper parameters are displayed, and clear DTCs, following the instruction sheet.
The vehicle is now ready for the XM radio receiver to be activated.
- Thanks to Jason Macco
September 2003 GM TechLink