Welcome to the Cadillac XLR Forums!

Driver's seat rocks

Tiger38117

Member
Joined
Dec 28, 2016
Messages
18
Location
Memphis, TN
My driver's seat rocks back and forth on acceleratiom/braking. It's maybe 1/8 inch, just enough to be annoying. Is this a common problem? Any known fixes?

thanks
 
Thats not it, the mounts attached to the floor dont move, it seems to be something in the adjusting parts of the seat mechanism
 
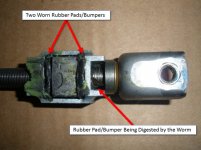
The problem is caused by one (or both) sides of the track's components wearing out over time. The worm drive has rubber bushings inside a block that follows the worm and act as hard stops. Over time, they get compressed and allow slack to develop. This results in the annoying "thunk" you feel when accelerating or braking. The driver seat is the most prone to this problem.

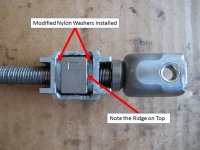
The fix costs less than a dollar and involves removing the seat, disassembling the two tracks, and installing modified nylon washers to remove the gap. Once I did this, I never had the problem again.

The repair isn't hard to perform, but there is a trick to it to ensure both tracks are properly aligned when reassembled, otherwise the seat can bind on the worm drives, causing other problems. Using tape to mark their positions makes this a non-issue.

I took a bunch of pictures and might have written a procedure when I did this a few years ago. I'll go through my notes tonight and post back, with the PN for the washers (available at Ace Hardware.)

This will get you started: Welcome to LIEBLWEB.com's Corvette Rocking Seat Fix! has a detailed procedure which is nearly identical for the XLR; I used it as a guide, but of course, there are several more beer steps involved for the XLR's seat track rehabilitation.

More to follow.

CC
 
Last edited:
Thanks!
 
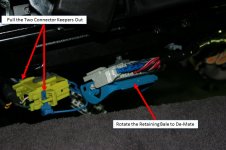
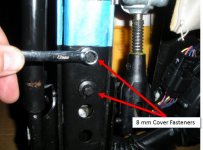
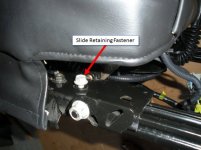
Seat Connectors.jpgCover Fasteners.jpgSlide Retaining Fastener.jpgWorn Rubber Pads.jpgInstalled Nylon Washers.jpg

Here are a few (old) shots to help clarify the XLR's fix.

The washer P/N is included in the previously-mentioned procedure.

There's a separate thread here somewhere that goes into detail regarding seat removal. They're heavy, so it's nice to have help getting them off the studs on the floor pan. I used a short length of 4" x 4" to prop up the seat to gain access to the connectors, before lifting the seat out. There are four nuts for the floor supports and one bolt on the seatbelt harness under a plastic cover that can be slid upwards.

PROTECT THE ROCKER PANELS WITH SOME THICK MATERIAL --LIKE A MOVER'S BLANKET, OR YOU RISK SCRATCHING THEM WHEN YOU LIFT THE SEAT OUT OF THE CAR!

Like the previously-referenced procedure states, move the seat forward and upwards. It needs to be forward to get both side's slides to the extreme end of the tracks, and makes it easier to access the two rear retaining nuts that hold the seat to the floor pan. Applying blue painter's tape to the tracks before they're disassembled makes aligning them much easier when you've had a few beers and decide to re-assemble everything.

A sanding block makes it easy to shape down the nylon washer so it fits properly. A set of calipers is nice to use as well. No special tools or talent is required to fix the seat. A camera is handy if you're like me and like to keep detailed references for re-assembly.

The first track takes the longest, and the second should take about half the time (at least until the beer starts to kick in. . . ) The grease has a way of migrating all over the place, so a roll of paper towels is useful.

For each seat, I rate this as a Three-Beer Mod.

Pic 1 (L-R) Shows the two connectors under the seat.
#2 shows some track cover fastener detail.
#3 shows a slide retainer.
#4 & 5 are before-and-after shots of the aluminum block.

Since the XLRs aren't getting any younger and this repair will likely be more and more popular, it would really help the community out if you can write some detailed notes (especially where it deviates from the C5 procedure) and take lots of pics. If you want, you can email the info to me and I'll label them and buff up the procedure for the benefit of all, giving you the lion's share of the credit, of course.

CC :wave:
 
Last edited:
Thank you CC :wave! Another worthy tutorial to save to my “I'm going to keep my XLR on the road forever" folder... :)

Sent from my Nexus 7 using Tapatalk
 

Cadillac XLR Forums

Not a member?  Join now!  It's Free!

Learn more about Supporting Membership

Win 2 Supercharged Cadillacs!

Win both supercharged Cadillac Vs!

Supporting Vendors

Taput Tunning LLC

Top Hydraulics

Cadillac XLR Registry

Click here to enter the official Cadillac XLR and XLR-V Registry
Back
Top Bottom