Welcome to the Cadillac XLR Forums!

Center-mount backup camera

wardlws

Active Member
Joined
Aug 17, 2022
Messages
28
Location
North Alabama
My XLR/V(s)
2005 Blue Steel / Shale
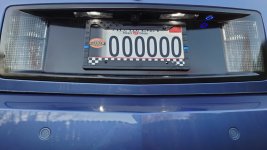
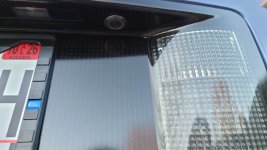
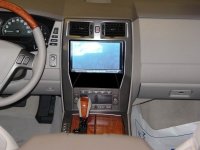
I'm nearly done with my backup camera install, and thought I'd post some pics. It took a bit to figure out where to mount a camera to look like factory and be in the center.

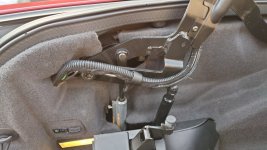
I decided to put it where the existing trunk open switch is and move the open switch to the right. This is better for me, since I'm right handed and tend to feel for it on the right side anyway.

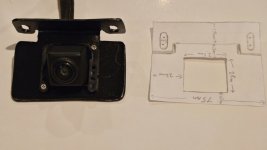
The camera is a used C7 camera... 2016, I think. It was the right price, good angle, and the correct size (after I removed the decorative cover).

I ran the RCA-style video cable down the left side and tucked it into the existing wiring harness there. The camera is powered from the reverse lights (since they are right there... no need to have more wires).

I still need to paint the screws and tweak the angle of the mount a bit. It gives a good view. I'll have to take a picture of it working later.
 

Attachments

  • camera_mount.JPG
    camera_mount.JPG
    59.1 KB · Views: 26
  • camera_wiring.JPG
    camera_wiring.JPG
    119.5 KB · Views: 25
  • lighted_trunk_switch.JPG
    lighted_trunk_switch.JPG
    102.4 KB · Views: 19
  • new_trunk_switch.JPG
    new_trunk_switch.JPG
    93.5 KB · Views: 26
If anyone is thinking about doing this yourself...

You'll need to buy new push pins for the trunk lid fabric and be careful when you remove it. The key fob antenna wires are glued to the fabric... you'll need to unplug them as you take the fabric panel off.

Be careful when you remove the plastic trim panels beside the seat. The rear vertical panel has clips that are glued on. You will probably need a strong epoxy to put at least one of them back on.

The door sill panel was the trickiest. You'll want to take your time and get plastic pry bars under it to work both sides of each clip. Otherwise, you could cause stress marks that will show.

The kick panel was easy and the under dash trim panel (with foot well light). The trunk carpet was easy too. Note the cargo net clips screw in/out.
 
wardlws

Nice job on this Camera.

What Stereo did you use, and how hard was that to get mounted?
Have any pictures of that?

Thanks,
CY
 
I'm not finished with the trim panel around the radio. I would have bought the Max Din, but I had an Alpine Z928HD from my old truck. It is an 8" screen with all of the bells and whistles.

Since I use an iPod and haven't used a CD in like 20 years... I put a single DIN pocket below the radio to hold my iPod and cell phone. I printed the pocket in PLA with Carbon Fiber using my 3D printer. Also, instead of using the Metra radio mount, which puts the radio way too low, I re-used the XLR radio mount to keep the radio at the original radio height.

Whenever my leather arrives, or I find another way to finish the trim panel, I'll post a better picture. Below is a digital mock-up picture.
 

Attachments

  • Digital_Mock-Up.jpg
    Digital_Mock-Up.jpg
    71.1 KB · Views: 10
Looks nice.
Did you cut the original trim pc for the angle toward the climate controls?

Just like most new stereo units, I don't see any knobs.
It is at least nice to have a volume knob.
Put a Jensen and Kenwood in some of my other vehicles, and they both had volume knobs.
 
Im working on one to mount the radio up higher inplace of the vents and move the vents down under the radio. Seems evety new car i drive is set up that way and i like the screen higher so i dont look down as much. Give me your opinion.. What kind of trunk button did you use?
 
Yes! Putting the navigation screen at the top is like most cars... at least, most cars that I like anyway. I'm curious how you would re-route the vents below the radio?

For the trunk open switch, I needed something super low-profile to fit between the gap in the license plate panel and the fiberglass trunk lid. Here is what I found: Short Mini Push Button Momentary Pressure Power Switch - Waterproof Car Boat Led | eBay The light is optional and comes in different colors and sizes. I believe that I ordered the 25mm. I wired the light into the license plate lights... when the license plate lights are on, so is the light from the switch. It has a good feel to it too. Slightly concave to find the center and has a solid push.
 
Did you cut the original trim pc for the angle toward the climate controls?

Yes, I cut the radio bezel to taper down below the radio to the climate controls. I was able to round the metal like it is around the radio. It isn't perfect, so I'm thinking about how to make it better.
 
@warlws
Very nice job so far!
That trunk release button is a good idea, especially with the lighted one!

I am busy as heck right now on another car project (my 55 Nomad, MUCH easier to work on, and worth much more than any XLR).
But in future, I may want to pursue a new Stereo and Backup Camera in my XLR, so I will be following and keeping these links!

@mickeytee and wardlws
Like to see how you guys re-do/route the AC vents.
I believe there is quite a bit of room back there, so is it possible to make new "ductwork" from ABS plastic or some other ducting you can get from like Vintage Air? I have built several special ducts over the years for my older cars.

Like I said before, my biggest fear of tearing into the XLR is breaking clips or damaging covers you can't get anymore!
Let alone all the electronics that could go bad :rolleyes:.

Thanks
CY
 

Cadillac XLR Forums

Not a member?  Join now!  It's Free!

Learn more about Supporting Membership

Double Your Chances!

Supporting Vendors

Top Hydraulics

Cadillac XLR Registry

Click here to enter the official Cadillac XLR and XLR-V Registry
Back
Top Bottom