Tinker
Active Member
Hi From the beautiful Oregon Coast,
My 2004 XLR's top stopped working mid cycle. The trunk lid wouldn't go down while opening the top. Since it wouldn't go down I hit the Up switch. The hydraulic pump ran, but the trunk wouldn't go up. Noticing that no matter whether the Up switch was pressed, or the Down switch was pressed, the trunk lid just dropped just a little, so opening the valve on the pump, the top was opened for the drive home. There is a procedure for raising the top manually, but it never mentions that an 8MM hex wrench is required (along with skinny forearms). This wasn't fun, but the top was raised to prevent the rain from ruining any future trips.
Since the trunk dropped no matter whether it was requested to raise, or lower, it appeared that the problem was either the control module, or the Pump/Solenoid Assembly. Inspecting the control module revealed that the board was conformally coated to make it waterproof, and there were no visible signs of component damage. The pump assembly was sent to Klaus at Top Hydraulics for repair. Klaus is a very nice and knowledgeable person. He exchanged my pump for a rebuilt one on the spot, asking if I would return with the XLR once the top was functional so his crew could see its operation for themselves.
The pump assembly was reinstalled. With high hopes and a smile the Down button was pushed. The windows lowered the proper amount; the trunk lid fully opened; front tonneau cover raised, the roof assembly lowered into the trunk, but apparently didn't fully latch, and there things ground to a stop. The up button was subsequently pressed. The roof assembly raised back into position, but didn't fully lock. Opening the valve on the hydraulic pump allowed the roof to be fully closed with the aid of the aforementioned hex wrench. Subsequently closing the valve and pressing the Down switch the roof assembly was raised for inspection to the mid positon. After a few minutes the Roof Assembly slowly dropped to the closed position. The valve was fully closed, which meant the hydraulic cylinders which operate the roof assembly were leaking. A leaking top latch cylinder was the likely culprit in not fully locking the Roof assembly as well, since the fluid level was normal.
There are seven hydraulic cylinders that operate the top. Three on mine are proven leaky, so apparently it's time to have all seven rebuilt. Does anyone have any experience with removing them?
Some of the problems were discovered with the aid of a Tech II. In real time mode it showed the Trunk lid position sensor (potentiometer) was loose so the limits weren't consistent. Other threads have pointed out the poor single screw mounting point which invariably will loosen causing operational failures. A spare sensor will be located and disassembled to find better method to fix this problem. The fix will be shared, but the other two potentiometers must be located prior to fixing the mount. Does anyone know where they are hiding? Has anyone replaced them? Any Tips?
Someone mentioned updated software should be installed in the Top Control Module. Does this exist, and if so where can this be found? Has anyone updated their software? In stating a software update was needed did this actually mean doing a re-learn procedure? Does the programing in the Top Control Module allow for position tolerance, or must the limit values exactly match. In example the potentiometer position value can be between 0-255. Lets say that in operation the current low limit required is 110. If the position sensor goes past this value to 105 does the program recognize that the sensor has fulfilled the requirement and proceed to the next program step, or does it require an exact match? Or does the program stop the operational step once the sensor matches the programed value of 110?
All of these details matter when you are trying to understand just how and why the top operation works. Once you understand then making changes to add reliability to the operation can be accomplished. This just means I'd like my top to reliably go up and down as intended.")
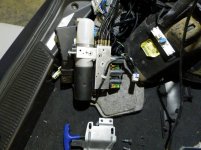
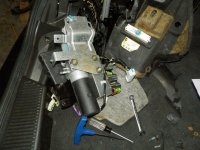
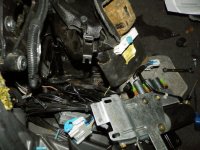
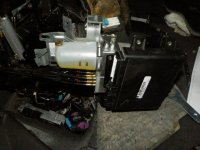
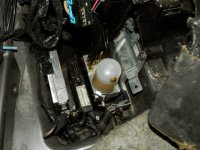
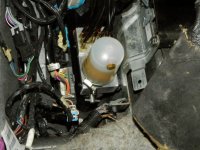
Removing and reinstalling the pump assembly takes a bit of effort so pictures are included for those who are curious.
My 2004 XLR's top stopped working mid cycle. The trunk lid wouldn't go down while opening the top. Since it wouldn't go down I hit the Up switch. The hydraulic pump ran, but the trunk wouldn't go up. Noticing that no matter whether the Up switch was pressed, or the Down switch was pressed, the trunk lid just dropped just a little, so opening the valve on the pump, the top was opened for the drive home. There is a procedure for raising the top manually, but it never mentions that an 8MM hex wrench is required (along with skinny forearms). This wasn't fun, but the top was raised to prevent the rain from ruining any future trips.
Since the trunk dropped no matter whether it was requested to raise, or lower, it appeared that the problem was either the control module, or the Pump/Solenoid Assembly. Inspecting the control module revealed that the board was conformally coated to make it waterproof, and there were no visible signs of component damage. The pump assembly was sent to Klaus at Top Hydraulics for repair. Klaus is a very nice and knowledgeable person. He exchanged my pump for a rebuilt one on the spot, asking if I would return with the XLR once the top was functional so his crew could see its operation for themselves.
The pump assembly was reinstalled. With high hopes and a smile the Down button was pushed. The windows lowered the proper amount; the trunk lid fully opened; front tonneau cover raised, the roof assembly lowered into the trunk, but apparently didn't fully latch, and there things ground to a stop. The up button was subsequently pressed. The roof assembly raised back into position, but didn't fully lock. Opening the valve on the hydraulic pump allowed the roof to be fully closed with the aid of the aforementioned hex wrench. Subsequently closing the valve and pressing the Down switch the roof assembly was raised for inspection to the mid positon. After a few minutes the Roof Assembly slowly dropped to the closed position. The valve was fully closed, which meant the hydraulic cylinders which operate the roof assembly were leaking. A leaking top latch cylinder was the likely culprit in not fully locking the Roof assembly as well, since the fluid level was normal.
There are seven hydraulic cylinders that operate the top. Three on mine are proven leaky, so apparently it's time to have all seven rebuilt. Does anyone have any experience with removing them?
Some of the problems were discovered with the aid of a Tech II. In real time mode it showed the Trunk lid position sensor (potentiometer) was loose so the limits weren't consistent. Other threads have pointed out the poor single screw mounting point which invariably will loosen causing operational failures. A spare sensor will be located and disassembled to find better method to fix this problem. The fix will be shared, but the other two potentiometers must be located prior to fixing the mount. Does anyone know where they are hiding? Has anyone replaced them? Any Tips?
Someone mentioned updated software should be installed in the Top Control Module. Does this exist, and if so where can this be found? Has anyone updated their software? In stating a software update was needed did this actually mean doing a re-learn procedure? Does the programing in the Top Control Module allow for position tolerance, or must the limit values exactly match. In example the potentiometer position value can be between 0-255. Lets say that in operation the current low limit required is 110. If the position sensor goes past this value to 105 does the program recognize that the sensor has fulfilled the requirement and proceed to the next program step, or does it require an exact match? Or does the program stop the operational step once the sensor matches the programed value of 110?
All of these details matter when you are trying to understand just how and why the top operation works. Once you understand then making changes to add reliability to the operation can be accomplished. This just means I'd like my top to reliably go up and down as intended.
Removing and reinstalling the pump assembly takes a bit of effort so pictures are included for those who are curious.