Welcome to the Cadillac XLR Forums!

Help Finding a Coolant Leak - Pics

coolant leak

Something to check... there is a small hose coming off your tank goes across the top of your radiator. there are two plastic tee's coming off this line and go to throttle body and some where else? I had a leak and found both of the tee's were crumbling.. I replaced with brass tee's and leaks stopped. hope this helps
 
gsberry, thank you for the writeup/pics and you did a great job on a diff. project.:thumbsup:thumbsup:thumbsup AL
 
Trans Fluid Check

I got around to checking the trans fluid level today. It was 5-6 oz low from the rad replacement. The vehicle needs to be level, so without access to a lift, I used 4 jackstands. This is not the safest thing to do, you must be very careful when positioning the stands, and careful not to rock the car when starting or wrenching. Be sure you are on a level surface. A well positioned ditch could be an alternative.

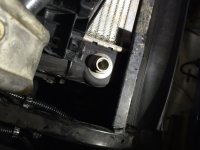
A fluid pump is necessary to add fluid, as there is no space to position a bottle above the fill plug (which is a rubber grommet with center pin). The thermometer probe I use for checking the HVAC temps was just long enough to reach the fluid through the fill hole. The trans fluid needs to be 86-122 degrees to get the right level. It took about 45 min for the trans to cool to 120 after steady driving. The level check bolt (shown in earlier post) is a 14 mm. Fluid will drip out once the right level is reached, so have a pan ready. Before adding fluid (recall this is a level check, not drain and fill, otherwise you would want at least some fluid in the trans before running), the car needs to be running, and you need to cycle through each shift position for 3 secs each, then return to park.

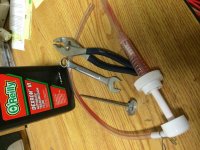
The tools for this check are pictured below (14 mm wrench, pliers to pull grommet plug, temp probe, dex vi fluid, fluid pump). As usual for this car, much more difficult than necessary, but not all that bad.
 

Attachments

  • image.jpg
    image.jpg
    121 KB · Views: 522
Last edited:
Thanks for posting the transmission info in detail. Your efforts to document this and the radiator replacement are really appreciated. I want to change the fluid and filter in my 2006 V with about 75,000 miles on it. Looks easier than the 5L50 in my 2005 STS. On that one the excess fluid drips out on to the hot exhaust pipe which will also burn you in the process of trying to reinstall the plug. Fortunately I do have a lift which will make it a lot easier than crawling under the car. The lift was a must have when I turned 60 years old!

I just noticed that you are in Houston. You are welcome to come up and use my lift anytime, beats putting your car up on jackstands and a lot safer too. Also have a Tech 2 which makes reading the trans temp a lot easier.
 
Last edited:
Rad Replacement

Great write up and detailed photos, thank you very much. I hope I won't need it but you never know. My radiator was replaced by the previous owner. I did notice the other day a small puddle on the drivers' side but it seems closer to the surge tank. I am going to look at it to seem if I had a split like yours.

I do have a question why did you conclude that you needed to replace your rad when you found that the source of the leak was the split in our surge tank? What led you to the rad?
 
Thanks & Look Back to Posts 10 & 12

I just noticed that you are in Houston. You are welcome to come up and use my lift anytime, beats putting your car up on jackstands and a lot safer too. Also have a Tech 2 which makes reading the trans temp a lot easier.

Thanks onalaska! I may take you up on that someday, though I live all the way down in the city by Memorial Park, so its still quite a hike up to Coldspring.

I do have a question why did you conclude that you needed to replace your rad when you found that the source of the leak was the split in our surge tank? What led you to the rad?

Take another look at posts 10 and 12. Post 10 shows the surge tank - where you attach the pressure tester - and the last picture of post 12 shows the leak coming out the side tank of the rad - which is integrated to the rad. The pics in post 1 also show several angles of the side tank where I suspected the leak was coming from, before confirmation. I have heard of people servicing the side tank at a rad shop, but seems to me like it would be prone to failure. You must have a pressure tester w/ surge tank thread adapter to find the source of the leak. The tester kit is available as a loaner tool at most auto parts stores - I prefer O'Rieleys tools, they tend to be better quality.

I too had a smallish puddle of coolant on the floor b/c the crack on the side tank of the rad was near the top, so only a small amount of fluid could seep out. Be sure to re-read the early posts in this thread if you're having trouble with the tester as I was, there is an overflow tube on the back side of the surge tank cap neck that is not entirely obvious - this needs to be plugged to get pressure, I just used my thumb.
 
Last edited:
I'm not trying to be a smart ass here but how do you know its not leaking while you're driving, sure when you pull in the garage it leaks and its been leaking while you're driving. I had a leak up in the top left corner of my radiator dealer replaced it under warranty said they had issues with them. 2006 V on extended warranty. 03/23/13
 
I'm not trying to be a smart ass here but how do you know its not leaking while you're driving, sure when you pull in the garage it leaks and its been leaking while you're driving. I had a leak up in the top left corner of my radiator dealer replaced it under warranty said they had issues with them. 2006 V on extended warranty. 03/23/13

Quite possible, but I did not observe any noticeable leak while idling in the garage for 15 min or so as I inspected the rad. Granted this is not the same as driving, but is really beside the point. A pressure test while cold (really just not boiling hot) is the best diagnosis.
 
Radiator Fitting

I have a really crazy question, I have recently developed a serious coolant leak and after looking for the source I found this open fitting on the drivers side of the radiator. There are no tubes attached to it nor the upper one. Is this tank for the V version of this car? I have a 2004 normally aspirated engine, I seemed to remember that the previous owner had the radiator replaced could it be that my engine didn't use this part of the radiator and now the core is compromised and leaking into this area? Am I looking at needing a new radiator? I don't see any lines in the vicinity of these fittings that may have popped off. See photo below.
 

Attachments

  • Rad Fitting.jpg
    Rad Fitting.jpg
    107.8 KB · Views: 794
Help Finding a coolant leak

What you are seeing is I believed the engine oil cooler. Your 04 did not have this. If you do not see antifreeze leaking out or around those fitting that's not your problem. When the previous owner replaced the radiator he used the V version radiator. You need to pressurize the system to find where your leak is .
V happy

Ok that makes sense I just wanted to make sure. Thanks for the response. I borrowed a pressure kit from a local autoparts store but I don't think it's going to work since the purge port of the over flow tank is not sealed. Have you pressurized this system before? Any hints?
 
Leak Found!

First of all I really want to thank GSBARRY for his posts and all of the effort taken to detail the steps taken to perform this repair. I found my leak it was on the upper portion of the drivers' side tank. At that same time I replaced my water pump, belts and thermostat. I would caution anyone doing this repair to run a tap down the bolt holes since I had trouble with mine. Today I fill all the systems and perform a leak check, we'll see what new adventures that provides.
 
Just replaced the Radiator in my 05 XLR with the same problem!

Good News! I did not have to remove the AC condenser!! I chased this problem around for about a month. I could have saved a bunch of headaches if I would have bought a radiator pressure tester first!! Harbor Freight has one for about $68 if you use their coupon. Beware don't buy their hose clamp assortment - they are garbage.
I have about 105k miles on my XLR and the issue ended up being a hairline crack in the radiator manifold that leaked at about 11 psi. I checked it after removing the plastic shroud that covers the radiator top - then filling up the radiator and reservoir with radiator fluid. The crack was on the drivers side - top front (between the AC Condenser).
To remove the radiator after draining
  • Remove the air intake stuff, the upper radiator hose and the small coolant lines.
  • Unbuckle the heater hose and the electrical conduit from the fan shroud.
  • Remove the shroud that covers the A/C Condenser ( 7 screws on bottom and 2 plastic rivets lower center and 2 on each side).
  • Remove the Temperature sensor connector on the passenger side of the front shroud - low.
  • You will have to bend and fold the shroud to get it out (flexible plastic - just exercise patience and hold yer jaw right!) be careful so that you don't damage the condenser.
  • remove the upper and the lower Trans coolant line ( Pull back plastic protector - remove the C clip retainer and pull the line out)
  • Detach the lower radiator hose and the electrical connector for the fan.
  • Gently lift condenser up to detach from the Radiator Retainers.
  • Lift the Radiator and Fan Assy up about 1/2 way to remove a Heater Hose on the Drivers side Radiator front.
  • You now have very easy access to your belts, hoses and the water pump.
  • Reverse process to install. The only issue is the Condenser Shroud install - be careful so that you don't damage your condenser and exercise patience.
  • Have Fun!!

Lessons learned -
Obtain 2 - 3/8x1/4x3/8 brass barbed fittings (found on Amazon, couldn't find locally). to replace the plastic ones in the small coolant lines.
Water pump failed (I thought this is where the leak was originally - bearing failed and I thought this was the original problem) - You may want to replace this item when you have the radiator out.
Replace the belts and hoses - very easy to change when the radiator is out.
I bought my radiator from a local shop for $121 - (made in America)
Funny readings on the DIC about Service Fuel System and the Fuel Gauges were erratic when the coolant leak was spraying on the ECM which went away when I washed the coolant out of the engine compartment and it dried)
 
It is possible to change out the Radiator with out pulling or disturbing the AC condenser trick but possible Ive done it!
 

Cadillac XLR Forums

Not a member?  Join now!  It's Free!

Learn more about Supporting Membership

Win 2 Supercharged Cadillacs!

Win both supercharged Cadillac Vs!

Supporting Vendors

Taput Tunning LLC

Top Hydraulics

Cadillac XLR Registry

Click here to enter the official Cadillac XLR and XLR-V Registry
Back
Top Bottom