Welcome to the Cadillac XLR Forums!

how to change tail light bulbs 2005 xlr

jeff brown

New Member
Joined
Oct 11, 2016
Messages
3
Location
michigan
My XLR/V(s)
2005 xlr blue red
I have the tail light assembly in my hand unplugged the harness but not sure if I can open it to change the bulbs not working. Before I break it I'm asking. Thanks , Jeff
e mail invaderjb@gmail.com if possible.
 
They are LEDs that generally you can't replace. DONT break it, replacements are going for $3000 each if you can find one. Search the forum, there is talk of someone being able to repair it for you for about $550
 
Had taillight repair done by Vettronics..Call Travis..618-975-3607
nice guy..happy with results
Hope this helps...

Sent from my LG-H910 using Tapatalk
 
Had taillight repair done by Vettronics..Call Travis..618-975-3607
nice guy..happy with results
Hope this helps...

Sent from my LG-H910 using Tapatalk

Yes! He did both of mine. Sent me photos when done. All polished and look
like new. $1000 for both rebuilds. He mailed them back yesterday. Should receive the in a few days. Took about a week and half.
 
Last edited:
taking apart 2005 XLR tail light

I have the 2005 and the tail light started blinking fast.
All lights seem to work - just blinks fast for turn signal;.
I found water in the light.
I drilled a small hole at the bottom and water came out for a couple minutes.
After a day or two to dry out, it still blinks fast.
So I researched how to disassemble.
Heating at 220F for 8 minutes really does soften the glue.
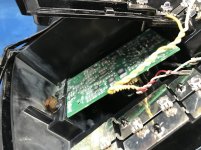
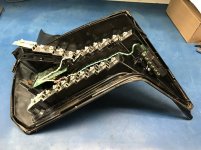
photos below.
Problem is PCB with 60+ parts and a microcontroller on it make it impossible to work on.
image1.jpgimage2.jpg
 
Body parts and tail light replacement

I have two observations, and will certainly appreciate some expert advice.

The gentleman who opened up the tail unit--- thank you. We note a computer circuit board that is triggering the led bulbs. What voltage is coming out of that circuit board? LED's work on DC voltage, so part of that circuit board is a regulated power supply. The other major function is triggering the application of that voltage based on inputs from brakes, directionals, and what else is left????


I also saw this on-line... any thoughts or comments? [h=2]Five Star Fabricating 215-417-OR - Five Star Fabrication MD3 Cadillac XLR Complete Combo Kits[/h]
<input type="checkbox" id="compareCheck_FIV-215-417-OR" name="Compare" style="margin-right: 0px; margin-left: 3px; padding: 0px; border-width: 0px; outline: 0px; font-size: 13px; vertical-align: middle; background-image: initial; background-position: initial; background-size: initial; background-repeat: initial; background-attachment: initial; background-origin: initial; background-clip: initial; height: 13px; width: 13px;"><label id="labelText_FIV-215-417-OR" for="compareCheck_FIV-215-417-OR" style="box-sizing: border-box; margin: 0px; padding: 0px 0px 0px 4px; border: 0px; outline: 0px; font-size: 12px; vertical-align: baseline; background: transparent; display: inline;">Compare</label>​

New Style Dirt Nose MD3, Body Panel, Cadillac XLR Combo, High-Impact Plastic, Orange, Five Star Fabricating
Not Yet Reviewed
Part Number: FIV-215-417-ORMore Detail...
Estimated Ship Date: 8/7/2017(if ordered today)

$254.97
<form action="https://www.summitracing.com/search?SortBy=BestKeywordMatch&SortOrder=Ascending&keyword=Cadillac%20XLR" id="addtoForm_FIV-215-417-OR" method="post" style="box-sizing: border-box; margin: 0px; padding: 0px; border-width: 0px; border-style: initial; border-color: initial; outline: 0px; vertical-align: baseline; background: transparent; float: right;"><fieldset style="box-sizing: border-box; margin: 0px; padding: 0px; border-width: 0px; border-style: initial; border-color: initial; outline: 0px; vertical-align: baseline; background: transparent;">
<input name="quantity" size="1" type="text" value="1" maxlength="3" style="box-sizing: border-box; margin: 0px; padding: 2px 3px; border-width: 1px; border-style: solid; border-color: rgb(153, 153, 153); outline: 0px; font-size: 13px; vertical-align: middle; background-image: initial; background-position: initial; background-size: initial; background-repeat: initial; background-attachment: initial; background-origin: initial; background-clip: initial; height: 29px; line-height: 1.2; font-family: Helvetica, Geneva, Arial, SunSans-Regular, sans-serif; width: 24px;">​

<input name="addtocart" title="Click here to add FIV-215-417-OR to your shopping cart." value="+ Cart" class="button button-checkout" type="submit" alt="Click here to add FIV-215-417-OR to your shopping cart." style="margin: 0px 0px 5px; padding: 5px 15px 4px; border-width: 0px; border-style: initial; border-color: initial; outline: 0px; font-size: 16px; vertical-align: baseline; background: rgb(41, 121, 0); border-radius: 3px; color: rgb(255, 255, 255); height: 30px; cursor: pointer; font-weight: bold; line-height: 20px; font-family: Helvetica, Arial, Geneva, SunSans-Regular, sans-serif; min-width: 80px; box-shadow: rgb(102, 102, 102) 0px 0px 1px;"><input type="image" src="https://www.summitracing.com/images/button-add-wishlist.gif" title="Click here to add FIV-215-417-OR to your shopping wishlist." alt="Click here to add FIV-215-417-OR to your shopping wishlist." name="addtowishlist" class="result-wishlist no-dbltap" style="box-sizing: border-box; margin: 0px 8px 0px 0px; padding: 0px; border-width: 0px; outline: 0px; font-size: 13px; vertical-align: baseline; background-image: initial; background-position: initial; background-size: initial; background-repeat: initial; background-attachment: initial; background-origin: initial; background-clip: initial;">​
</fieldset></form>


  • Drop Ship

  • Oversize


XLR tail light

The board inside the tail light is impossible to work on. It is conformal coated. That is a plastic like layer painted n to insulate and protect parts. There are 4 pins to the connector. One is ground. Two seem to be power and they operate the two functions in the assembly. The fourth pin seems to be a digital (computer logic) interface to the car. I couldn't fix the problem and may go to one of the outfits listed above.
 
The board inside the tail light is impossible to work on. It is conformal coated. That is a plastic like layer painted n to insulate and protect parts. There are 4 pins to the connector. One is ground. Two seem to be power and they operate the two functions in the assembly. The fourth pin seems to be a digital (computer logic) interface to the car. I couldn't fix the problem and may go to one of the outfits listed above.


I took a long look at the schematic... I was wondering if a simple "work around" were possible, but experimenting with the obvious inputs and outputs will likely leave you with other issues that would, no doubt, plague you with various notifications on your dash, and who knows what else. The rear lights interface with the car's central ecm. Go figure! Wishing you the best for a good outcome, and thank you for sharing your explorations with us... Those four wires look very temping...

Happy day, James
 
The board inside the tail light is impossible to work on. It is conformal coated. That is a plastic like layer painted n to insulate and protect parts. There are 4 pins to the connector. One is ground. Two seem to be power and they operate the two functions in the assembly. The fourth pin seems to be a digital (computer logic) interface to the car. I couldn't fix the problem and may go to one of the outfits listed above.

Conformal coating is used to encapsulate, insulate, and more importantly, protect a PCB from shock, humidity, and limited amounts of moisture. Conformally-coated PCBs are not difficult to work with if you have the training. Most modern conformal coatings are urethane-based, and easy to apply and remove. Varnish and epoxy were popular a long time ago, and were a mess to work with.

(Incidentally, I train and certify all the electronic repair techs where I work as a collateral duty. I've been qualified to perform the highest level of NASA electronic repairs for thirty years.)

If you can post high-resolution photos of both sides of the PCB, I can probably create a schematic and using the service manuals, point you in the right direction to troubleshoot and repair it if you have basic electronic repair tools. If it looks simple and you don't want to deal with it, maybe we can work something reasonable out. I'm not out to make a killing on parts repair.

CC :wave:
 
Last edited:
I have two observations, and will certainly appreciate some expert advice.

The gentleman who opened up the tail unit--- thank you. We note a computer circuit board that is triggering the led bulbs. What voltage is coming out of that circuit board? LED's work on DC voltage, so part of that circuit board is a regulated power supply. The other major function is triggering the application of that voltage based on inputs from brakes, directionals, and what else is left????


I also saw this on-line... any thoughts or comments? Five Star Fabricating 215-417-OR - Five Star Fabrication MD3 Cadillac XLR Complete Combo Kits


<input name="Compare" id="compareCheck_FIV-215-417-OR" style="margin-right: 0px; margin-left: 3px; padding: 0px; border-width: 0px; outline: 0px; font-size: 13px; vertical-align: middle; background-image: initial; background-position: initial; background-size: initial; background-repeat: initial; background-attachment: initial; background-origin: initial; background-clip: initial; height: 13px; width: 13px;" type="checkbox"><label id="labelText_FIV-215-417-OR" style="box-sizing: border-box; margin: 0px; padding: 0px 0px 0px 4px; border: 0px; outline: 0px; font-size: 12px; vertical-align: baseline; background: transparent; display: inline;" for="compareCheck_FIV-215-417-OR">Compare</label>​

New Style Dirt Nose MD3, Body Panel, Cadillac XLR Combo, High-Impact Plastic, Orange, Five Star Fabricating
Not Yet Reviewed
Part Number: FIV-215-417-ORMore Detail...
Estimated Ship Date: 8/7/2017(if ordered today)

$254.97
<form id="addtoForm_FIV-215-417-OR" style="box-sizing: border-box; margin: 0px; padding: 0px; border-width: 0px; border-style: initial; border-color: initial; outline: 0px; vertical-align: baseline; background: transparent; float: right;" action="https://www.summitracing.com/search?SortBy=BestKeywordMatch&SortOrder=Ascending&keyword=Cadillac%20XLR" method="post"><fieldset style="box-sizing: border-box; margin: 0px; padding: 0px; border-width: 0px; border-style: initial; border-color: initial; outline: 0px; vertical-align: baseline; background: transparent;">
<input name="quantity" style="box-sizing: border-box; margin: 0px; padding: 2px 3px; border-width: 1px; border-style: solid; border-color: rgb(153, 153, 153); outline: 0px; font-size: 13px; vertical-align: middle; background-image: initial; background-position: initial; background-size: initial; background-repeat: initial; background-attachment: initial; background-origin: initial; background-clip: initial; height: 29px; line-height: 1.2; font-family: Helvetica, Geneva, Arial, SunSans-Regular, sans-serif; width: 24px;" type="text" size="1" maxlength="3" value="1">​

<input name="addtocart" title="Click here to add FIV-215-417-OR to your shopping cart." class="button button-checkout" style="margin: 0px 0px 5px; padding: 5px 15px 4px; border-width: 0px; border-style: initial; border-color: initial; outline: 0px; font-size: 16px; vertical-align: baseline; background: rgb(41, 121, 0); border-radius: 3px; color: rgb(255, 255, 255); height: 30px; cursor: pointer; font-weight: bold; line-height: 20px; font-family: Helvetica, Arial, Geneva, SunSans-Regular, sans-serif; min-width: 80px; box-shadow: rgb(102, 102, 102) 0px 0px 1px;" type="submit" alt="Click here to add FIV-215-417-OR to your shopping cart." value="+ Cart"><input name="addtowishlist" title="Click here to add FIV-215-417-OR to your shopping wishlist." class="result-wishlist no-dbltap" style="box-sizing: border-box; margin: 0px 8px 0px 0px; padding: 0px; border-width: 0px; outline: 0px; font-size: 13px; vertical-align: baseline; background-image: initial; background-position: initial; background-size: initial; background-repeat: initial; background-attachment: initial; background-origin: initial; background-clip: initial;" type="image" alt="Click here to add FIV-215-417-OR to your shopping wishlist." src="https://www.summitracing.com/images/button-add-wishlist.gif">​
</fieldset></form>


  • Drop Ship

  • Oversize


This looks like a cover -nothing more. The lights and grill appear to be graphics.
 
Mine does the same thing!!

I have the 2005 and the tail light started blinking fast.
All lights seem to work - just blinks fast for turn signal;.
I found water in the light.
I drilled a small hole at the bottom and water came out for a couple minutes.
After a day or two to dry out, it still blinks fast.
So I researched how to disassemble.
Heating at 220F for 8 minutes really does soften the glue.
photos below.
Problem is PCB with 60+ parts and a microcontroller on it make it impossible to work on. My r/rear is doing the same thing,blinking a little fast; but the turn signal is working? what was the problem with yours???
 
Hmm, do the tail lights blink fast when a regular incandescent is burned out on that side of the car too?
My fear would be he took this apart when the problem was a regular bulb burned out triggering the fast flash from the ecu?
 
A lot of times, One light blinking fast is due to either a bad ground on the system or the improper bulb In the circuit. I would have started with the front ground wire and also check the front turn signal bulb. It could have been replaced at some time with the wrong bulb. The computer that reads bulb out would be confused and maybe cause it blink fast. I really do not think it is the rear light that is the problem. they usually work or don't. Do the side upper lights burn? most people do not notice them being out on park. Of course if you got water out of the rear light you will have problems with it in the future. so might as well check it out and repair any corrosion before you try and seal it back up
 
Hmm, do the tail lights blink fast when a regular incandescent is burned out on that side of the car too?
My fear would be he took this apart when the problem was a regular bulb burned out triggering the fast flash from the ecu?

In the old days, blinking fast on one side meant a short circuit, (a burned out bulb in the front or rear), and replacing that bulb fixed the problem.
 
With the mix of LED tail lights and incandescent bulbs in the XLR turn signal circuit, any one of them having a problem trips the ECU into fast flashing, which is required by law on vehicles sold in the US to notify the driver a bulb is out. It's been the law for quite some time.

In the old days, blinking fast on one side meant a short circuit, (a burned out bulb in the front or rear), and replacing that bulb fixed the problem.
 
Law

With the mix of LED tail lights and incandescent bulbs in the XLR turn signal circuit, any one of them having a problem trips the ECU into fast flashing, which is required by law on vehicles sold in the US to notify the driver a bulb is out. It's been the law for quite some time.
I would be interested in seeing that law. that's a new one to me. Since about 10 years ago all cars where required to have a light on the dash to tell you there was a failed bulb. In the old days a bad bulb would cause the system to just not flash or flash very very slow. Many people would drive for months with a front bulb out and just manually blink the lever to make the back bulbs appear to be blinking . When a flasher of switch went bad and they came to inspection for a safety sticker we were required for them to step out of the car as they could manipulate the stalk lever by hand to simulate a flashing light.
 
§ 571.108 Standard No. 108; Lamps, reflective devices, and associated equipment.

I would be interested in seeing that law. that's a new one to me. Since about 10 years ago all cars where required to have a light on the dash to tell you there was a failed bulb. In the old days a bad bulb would cause the system to just not flash or flash very very slow. Many people would drive for months with a front bulb out and just manually blink the lever to make the back bulbs appear to be blinking . When a flasher of switch went bad and they came to inspection for a safety sticker we were required for them to step out of the car as they could manipulate the stalk lever by hand to simulate a flashing light.
 
Repair XLR tail light for $25.00

Head out to a junk yard and grab yourself a tail light from an SRX... the PBC board inside is the same part number as from an XLR. The only difference is a couple of the wires coming off it are a bit shorter, so you will have to splice on some extra length.

As for the led strips, one of mine was dead. I snipped off the extra length of the metal strip and LEDs from one of the SRX strips and with a bit of bending got it to match the approximate shape of my XLR strip. Everything reassembled just fine.

Total price $25.00

Whodathunkit! Wow, thanks for coming up with that, trying it, & sharing it! :thumbsup
 

Cadillac XLR Forums

Not a member?  Join now!  It's Free!

Learn more about Supporting Membership

Win 2 Supercharged Cadillacs!

Win both supercharged Cadillac Vs!

Supporting Vendors

Taput Tunning LLC

Top Hydraulics

Cadillac XLR Registry

Click here to enter the official Cadillac XLR and XLR-V Registry
Back
Top Bottom