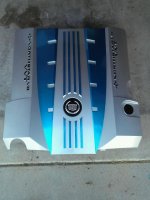
Here it is!
This is in my house and not my XLR as I am working on a few projects for the XLR and mine is a bit dusty still. Those new parts should be interesting and hopefully spark some interest back into the XLR.
The Process:
First off….the paint on my cover was so loose that chunks of it came off as I was whipping it down with a damp cloth. So I had to redo some of the silver areas as well.
1. I sanding everything down that was to be painted.
2. I masked out the different areas to paint which took forever
3. Then painted with a high temp engine paint.
4. I sanded with some 1000 grit paper in between to make sure a nice smooth finish and repainted. Each are about 3-5 coats.
5. The paint is really touchy when it is fresh and did chip a few times so I had to repeat these steps a few times.
6. Once everything was painted I applied a satin clear coat finish to everything. This insured an overall bond. I put on about 5 layers of the satin.
7. I let it bake for about 4 hours.
And after 3 days of work...here it is!
 chuckle) ....


