Welcome to the Cadillac XLR Forums!

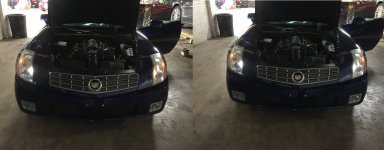
LED running lights installed in my headlights.

BeardBros

Seasoned Member
Joined
May 8, 2017
Messages
147
Location
Central Illinois
Since I have restored my headlights and want to keep as much heat out of them as possible I installed some Phillips Zevo ultra bright 6000K 194 bulbs in my headlights. Nice bright white light and no heat to damage the lens. Sort of a paint to get them out and back in but worth it. I got them at O'Reilly's for around $6.00 each.

Here you can see the difference, LED on the left and regular 194 on the right.
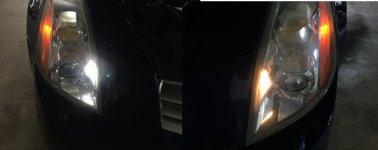
IMG_484ghgh9.jpg

IMG_4ghtyui848.jpg

I am going to swap all the lights for LED in the headlights, I will post when I do those.
 
good job

the 194s don't get very hot but the ones you need is the upper yellow turn signals. 3757 bulbs That's the ones if people had changed them when new would have prevented the plastic melt and breakage of those lens
 
I just finished mine up last night.

To get the housings out, turn the wheels in on the side you want to access. Remove the three plastic trim retainers from the fender liner edge in front of the tire. Remove three downward-facing 10mm nuts that fasten the headlights to the body. They should not be very tight. Protect the painted bumper edge or you will almost certainly scratch the paint. Wiggle the headlight housing up a little and remove it from the front. I then applied tape to the bottom of the housing bolts to further lessen chances of scratching things.

The inside white and outside amber bulbs are 194. Always use an LED bulb that matches the lens color. The top turn signal/DRL is an amber 3757, as mentioned in the previous post. All three are mounted in twist-to-lock sockets which the bulbs pull straight out of.

Test the bulbs before reassembly. Some LED bulbs are polarity specific, so if they don't work, try pulling them and turning the base 180 degrees.

I replaced my headlight bulbs with genuine original, stock bulbs. If opening them up, you'll need a T15 Torx bit (3 screws) and a #2 Phillips bit (2 screws). Don't touch the glass part of the bulb, but if you do, wipe the glass off with rubbing alcohol on a clean cloth.

Take a minute to wipe any wax stuck on the housing molding. I applied some 303 aerospace protectant to the moldings as well (UV blocker). Don't overtighten the 10mm nuts holding the housings in place. And don't forget the fender liner retainer pins.

John B.
 
did you replace the upper 3757 bulbs with led and did you have the hyper flash turnsignal? did you use switchback bulbs also make sure on the 3 headlight studs that none of the plastic/metal washers fall off . they are what align the headlights to the fenders.
 
I used LED bulbs and I did not need resistors as they do not hyperflash. Apparently all the washers stayed in place. And I just used single color bulbs.

John B.
 
many members here have argued that you cannot replace the upper ,turn signal/ driving lamp without adding a resistor as it will hyperflash. Please provide us with the bulbs you used. as I am sure many want to change to led so as not to further heat up the driving light lens and cause them to completely melt , but do not know how to add the inline resistor needed by most all of the bulbs. switchback bulbs look great as they have a white driving light and a yellow turn signal but require the resistor but your bulb would be much easier for most members.
 
My lenses are so "melty" inside where the stock bulb was at that a switchback bulb probably would not look good in white in DRL mode. The burned plastic makes it work well for amber, however.

My bulbs came from superbrightleds.com and I just picked it off their recommendations after using their vehicle sort menu. And when
I say it doesn't hyperflash, I mean it works, maybe blinking a bit faster than before but it does cycle. It does not help that one row of my passenger side tail light is out, as the right signals already flashed faster than the left because of the lower amp draw.

Resistors are really easy to install, if desired. The hard parts are finding a place to mount them where they won't melt anything (they get hot) and determining which wires to tap. Once you have that, the resistor's two leads simply tap onto the positive and negative wires going to the bulb. My source above sells them complete with crimp-on taps for about $5. I've used them on other vehicles.

John B.
 
thanks. That sounds about right. There are several companies now selling switchback bulbs with canbus they claim will not hyper flash and are all contained. The soldering is not that much of a problem its jut the locating the resistor away from anything . I mounted mine on an old heat sink out of a computer. it does not get hot enough that I cannot mount it on the fiberglass panel. Thanks for the get back and we are looking for an easy way to keep these from getting hotter. By the way I have the inner lens for both sides if anyone needs a set. they sure do improve the look but they are work to install at this point MAybe do a 30 second count of it blinking and we can let people know if that's too fast for them .
 
Rescueken, you can install load resistors across the + and - leads that power the turn signal circuit. They place an additional "load" on the circuit and slow the turn signal flashing down. They are not expensive and I listed my source earlier in this post, www.superbrightleds.com although I have left mine alone for over a year and haven't had a problem. It may be due to the actual bulb itself. What was your source?

John B.
John, I bought the Sylvania led’s at Autozone! I’m going to check out the website you provided! Thanks Ken
 

Cadillac XLR Forums

Not a member?  Join now!  It's Free!

Learn more about Supporting Membership

Win 2 Supercharged Cadillacs!

Win both supercharged Cadillac Vs!

Supporting Vendors

Taput Tunning LLC

Top Hydraulics

Cadillac XLR Registry

Click here to enter the official Cadillac XLR and XLR-V Registry
Back
Top Bottom