5 months ago I installed a pair of headlight assemblies from a 2006 XLR. The passenger headlamps had a very small area of crazing on the DRL lens. One day, after the car was in the 95 degree summer heat and a 40 mi drive and back - I noticed some more deterioration on the Pass. Lens and a small pea size area on the driver side.
I decided then to convert to LED. I did much reading on other forums (Corvette Action) as well as learning that Chicago Dave successfully installed LEDs for his DRLs. The catch for turn signals is that the BCM interprets the low resistance from the LEDs as a burned out bulb resulting in hyper flashing of the turn signal. Installation of a resistor fixes this.
Installation:
After research, I decided on Superbright LEDs. Our DRL direct replacement bulb us a 3757 bulb. Some state a CK after the bulb, some do not. The LED replacement was a 3157 which has tabs centered on each side of the socket whereas the 3757 are offset. The 3157 worked just fine. I ordered the Amber LEDs and they have a low profile bulb that is a direct fit. I did not order the Can-Bus compatible bulbs. Didn't need them.
3157 LED Bulb - Dual Function 18 SMD LED Tower - Wedge Retrofit | LED Brake Light, Turn Light and Tail Light Bulbs | LED Car Light Bulbs | Super Bright LEDs
Along with the LEDs the site recommended the load resistors that eliminate the hyper flashing.
LED Light Load Resistor Kit - LED Turn Signal Hyper Flash & Warning Fix | Flashers & Load Resistors | Car Bulb Installation Supplies | LED Car Light Bulbs | Super Bright LEDs
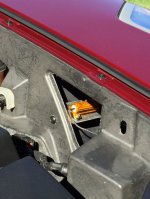
After ordering and receiving these, all for a cost of about $40 for both passenger and driver sides, I proceeded to install. The headlights do have to be removed, so the panel was removed in the wheel well. Like others have stated, by turning the wheel to the right ( for left wheel well) I was able to remove the panel. Removed the headlamp for access to the DRL/turn signal bulb. Some posts suggested cutting off the tabs on the socket, but I installed keeping them in place and the installation worked as advertised. Next was the resistor installation.
I HIGHLY recommend reviewing the wiring diagram for the DRLs just to be sure what your wiring should be. For my 2004, the Driver side DRL was the Dark-Blue/white wire and the ground wire that the resistor is tied to. The pass. Side is Lt. blue/white wire and the ground wire. The web site states that the resistor should not be directly mounted on plastic because of heat dissipation. Well, about 90% of our cars are composite/plastic, so I decided to mount these on standoff nuts like those used on PC boards - Radio Shack, $1.99.

.

The splices that come with the resistors take a bit of trial and error (for a non-electrical type) but work as advertised. I will post videos of the before and after resistor installation. Bottom line, the LEDs are just as bright as the incandescent bulbs and the resistor fixes the hyper flashing. My primary motivation here is to let the resistors dissipate the heat outside of the headlamp assembly and save my DRL lenses from deteriorating any further.
Tim
Sent from my iPhone using Tapatalk
I decided then to convert to LED. I did much reading on other forums (Corvette Action) as well as learning that Chicago Dave successfully installed LEDs for his DRLs. The catch for turn signals is that the BCM interprets the low resistance from the LEDs as a burned out bulb resulting in hyper flashing of the turn signal. Installation of a resistor fixes this.
Installation:
After research, I decided on Superbright LEDs. Our DRL direct replacement bulb us a 3757 bulb. Some state a CK after the bulb, some do not. The LED replacement was a 3157 which has tabs centered on each side of the socket whereas the 3757 are offset. The 3157 worked just fine. I ordered the Amber LEDs and they have a low profile bulb that is a direct fit. I did not order the Can-Bus compatible bulbs. Didn't need them.
3157 LED Bulb - Dual Function 18 SMD LED Tower - Wedge Retrofit | LED Brake Light, Turn Light and Tail Light Bulbs | LED Car Light Bulbs | Super Bright LEDs
Along with the LEDs the site recommended the load resistors that eliminate the hyper flashing.
LED Light Load Resistor Kit - LED Turn Signal Hyper Flash & Warning Fix | Flashers & Load Resistors | Car Bulb Installation Supplies | LED Car Light Bulbs | Super Bright LEDs
After ordering and receiving these, all for a cost of about $40 for both passenger and driver sides, I proceeded to install. The headlights do have to be removed, so the panel was removed in the wheel well. Like others have stated, by turning the wheel to the right ( for left wheel well) I was able to remove the panel. Removed the headlamp for access to the DRL/turn signal bulb. Some posts suggested cutting off the tabs on the socket, but I installed keeping them in place and the installation worked as advertised. Next was the resistor installation.
I HIGHLY recommend reviewing the wiring diagram for the DRLs just to be sure what your wiring should be. For my 2004, the Driver side DRL was the Dark-Blue/white wire and the ground wire that the resistor is tied to. The pass. Side is Lt. blue/white wire and the ground wire. The web site states that the resistor should not be directly mounted on plastic because of heat dissipation. Well, about 90% of our cars are composite/plastic, so I decided to mount these on standoff nuts like those used on PC boards - Radio Shack, $1.99.

.

The splices that come with the resistors take a bit of trial and error (for a non-electrical type) but work as advertised. I will post videos of the before and after resistor installation. Bottom line, the LEDs are just as bright as the incandescent bulbs and the resistor fixes the hyper flashing. My primary motivation here is to let the resistors dissipate the heat outside of the headlamp assembly and save my DRL lenses from deteriorating any further.
Tim
Sent from my iPhone using Tapatalk
Last edited:


