Welcome to the Cadillac XLR Forums!

Must read: Replacing trunk lid struts

nvme

Active Member
Joined
Dec 16, 2014
Messages
35
Location
north las vegas, nevada
My XLR/V(s)
2008
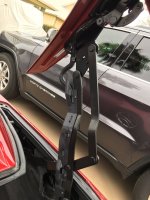
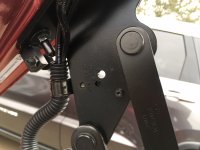
I finally got around to putting on the struts today so my top will operate as it should. Back in December of 2019 my top didn't work and I posted a thread and got a couple of answers which was helpful. Anyway I search the many post and threads here and everyone of them stated that you can't depress the struts cause they are about 1/4" too long and what to do. I believe Long Tall Sally said he made a tool that worked and sent to someone to use etc. etc. That's is fine and I am sure we all appreciate it, however that isn't necessary. I have a shop manual and on page 12-58 (which I finally found) it gives instructions on how to do it. Now there is a key point that no one has mention and that is there a "travel limit screw" that has to be removed. I did it to one side and the lid wouldn't go up high enough so I did the other side and it worked just fine. A friend held it up as I told him to i.e. a little more or a little less and the strut went on easily. For those that don't have a shop manual the "travel limit screw" is located on the bracket attached to the lid and on it is two pivots one strap above the other and the screw is behind the top strap. You'll have to look for it as it quite small and you have to lean inside the trunk to see it, I believe it takes a T-9 star bit and when you put it back in use Locktite. Hope this thread will make it much easier for you if you should need to replace those struts.
 
Thanks a million, I thought I may need to change mine too, but when it shut on me it was a super winding day and the wind actually push it down, it has not happened again since then, which was last spring, but they maybe getting weak! So...Thanks again I really appreciate you sharing this information!


Sent from my iPhone using Tapatalk
 
The manual I bought is: GMC Service Manual for 2008 Cadillac XLR/XLR-V. There is 4 large volumes and 17 sections.
 
how much travel did that allow? I tried that but strong arm struts are about 1/4 to 3/8 longer than stock so they stay preloaded. My tool mostly let you hold the strut and snap it in on the drivers side a little easier than trying to do it manually. A photo of the location may help some see where it is
 
Sorry! I don't have a computer or a cell phone and even if I did I wouldn't know how to do it, I just have a MBOX. Anyway the struts I bought are Sachs and your are correct they are 1/4"-3/8" too long. I can't even guess how much range the travel limit screws removed allows for but it worked for me.
 
Hi nvme.

Was the Sachs Cylinders stems were retrack in their casing, usely they are for the hydraulic ones, in order to make it much easier for the installations of the struts.
On eBay the Sachs cylinders are gaz instead of hydraulics and the stem are not retrack.

If they are gaz, its is good to ear that they can be put on and the lid dont need the module to work, however would the retractable top will work fine ?

I like your self confidence as a DIY, yes a Cadillac XLR workshop manual is certainly a fine guide for the repairs of our XLR.

Good Luck.

IAN :wave:
 
"A photo of the location may help some see where it is"

The first photo is the overall shot of the right trunk hinge. The second photo is a close up of the travel limit screw.

The travel limit screw on the left hinge is in the same place.
IMG_1210.JPGIMG_1211.JPG
 
Last edited:
I can now see how to replace the right trunk strut. Access to the top connector is in plain sight and access to the bottom connector is made through the right storage box in the trunk.

For anyone who has replaced the left trunk strut, could you explain how you got access to the bottom connector to reinstall the circa clip. Access is restricted through the left control box by the hydraulic lines. The top connector is in plain sight.
 
I utilized a board to hold the trunk up. I removed the hinge travel limit screws on both sides. I changed the left strut in about 5 minutes. Removed the circa clips and pulled the top & bottom off their ball mount. Pushed new struts onto ball mounts.

On to the left side I knew that this one would be a challenge due to lack of access to the bottom mount. Removed the top circa clip and removed the top. After not being able to remove the circa clip on the bottom mount, I took a different approach. I unscrewed the bottom mount from the strut, leaving the bottom mount attached to the ball mount. I unscrewed the bottom mount from the new strut. Then screwed the new strut into the old strut mount that I left on the bottom mounting ball.

Worked like a charm......................................................IMG_1215.JPG
 
thats a pretty good deal. The right I believe was the easy one Passenger. A long thin screwdriver will pop off the circlip and you just dont worry if it pops off as the new one has one on it. The tool I had made it easy to push the bottom back on with a little leverage, As others can say you can adjust the limit screw but make sure you get it exactly correct when you readjust .If not when the trunk opens it will break the lower corner of the trunk lid near the roof .thats why I dont recommend that method. screwing the strut off the ball sounds good .I might try that on my next one .Thanks Good tip
 
Getting the travel limit screw adjusted properly was pretty easy as both sides were screwed totally in.
 
RHEAVN you are a godsend! Your suggestion to leave the bottom mount in place and unscrew the rest of the strut made the job a snap. You call yourself “seasoned” obviously for good reason. Thank you.
 
Getting the travel limit screw adjusted properly was pretty easy as both sides were screwed totally in.
Those screws were the shizzel! I was able to install them myself with out help, used a pole on one end to prop up one end then worked a side at a time best remove both side screws as it allows enough play to "wiggle" them on to the post. Now when i'm laying on my back to install the leaking roof cylinder the lid woun't be closing on me
 
Thanks for this post, made replacement soooo much easyer was able to prop up on side while I giggled the other.
 
rheavn, I bought the lift supports you recommened from Amazon and with the helpful tips in this forum I'm going to try to install them this weekend. Update after this weekend!
 
rheavn, I bought the lift supports you recommened from Amazon and with the helpful tips in this forum I'm going to try to install them this weekend. Update after this weekend!
well was it as easy as suggested?
 
well was it as easy as suggested?
We had on and off rain in my area last weekend and since I have have to pull the XLR out of the garage to do the work I put it off till this weekend. Update to follow when finfished.
 

Cadillac XLR Forums

Not a member?  Join now!  It's Free!

Learn more about Supporting Membership

Win 2 Supercharged Cadillacs!

Win both supercharged Cadillac Vs!

Supporting Vendors

Taput Tunning LLC

Top Hydraulics

Cadillac XLR Registry

Click here to enter the official Cadillac XLR and XLR-V Registry
Back
Top Bottom