Welcome to the Cadillac XLR Forums!

GM Press Release Removing inside trim drivers side A pillar.

XFireXLR

Seasoned Member
Joined
Sep 28, 2008
Messages
745
Location
Richmond,VA (Long Island, NY Transplant)
My XLR/V(s)
2006 Gold Mist Met. XLR
Need instructions on how to safely remove the inside trim to replace OnStar/Voice activation microphone. Any help would be greatly appreciated.:cool:


The molding just snaps onto the pillar. Just grasp it and pull straight out.


Last edited:
Thanks Cubby....much appreciated.
 
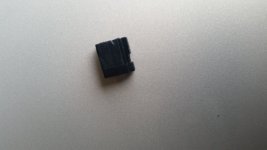
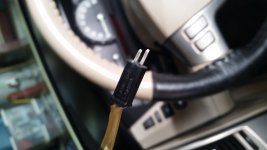
Thanks to Cubby's help I was able to remove the A pillar mounding and got the new mic installed and tested. Everything worked fine until I reinstalled the moulding, mic now does not work. Removed the moulding and now have noticed that the connector coming in has broken at end where it should lock into place. Also one pin is now loose and will not connect when inserted into the mic connector. I attempted to super glue the broken connector but the pin still moves and will not make the proper connection, you can actually see the wire coming out of the back of the connector. I am not sure if I broke the connector or it was slightly cracked from a previous install attempt of the mic, and reinstalling the moulding completed the break.

OnStar Plug Head.jpg OnStar Male Plug.jpg
Broken connector top and connector & wire coming into the car

the first picture is the connector top that should shield the the pins in the second picture. Also in the second picture you can see one pin is slightly lower than the other, this is the loose pin and you can see the wire pushing out of the back the connector. Need help with suggestions, I cannot find the part number for the wire that has the broken connector and how hard is it to replace this wire if needed. Also can the connectors be purchased and spliced in? Any help would be greatly appreciated. :cool:
 
Last edited:
Did you try to super glue the pin in place? I've don't that a few times in the past.
 
There are a couple of ways to repair this, depending on your skill level.

The easiest is to apply epoxy to the rear (not the face) of the connector body and use a tiny tool (like a toothpick) to gently "stir" the epoxy so it wicks into the connector a little and secures the pin. That way it won't back out when it cures and is inserted into the receptacle.

Retain the pin in place so it's the same length as it's partner, using tape or a plastic clamp that won't mar the finish on the pins.

Another method would be to crimp bullet splice connectors to each set of wires. They can be disconnected easily enough later if required.

Super glue (usually ethyl cyanoacrylate) can work, it wicks more (meaning it can go where it isn't wanted) and isn't recommended for electronic repairs of connectors.

Not sure what you are referring to with mounds and mounding. Do you mean mounts or molding, as in trim?

CC :wave:
 
Last edited:
Thank you all for responses, they are all much appreciated. The "moulding" is the inside A pillar trim piece, as per Cubby. I was considering using silicone at the back of the connector also.
 
Last edited:
Sorry for the typing errors, it is molding not mounding. You'd have thought I was wearing boxing gloves when I typed the response. I have corrected it.


Thank you all for responses, they are all much appreciated. The "mounding" is the inside A pillar trim piece, as per Cubby. I was considering using silicone at the back of the connector also.
 
Sorry for the typing errors, it is molding not mounding. You'd have thought I was wearing boxing gloves when I typed the response. I have corrected it.

Cubby...I have made the correction in my post. I know what you mean..... wearing boxing gloves to type, that's the reason my post came under the heading "GM Press Release".....lol :cool:
 
Last edited:
I was able to purchase a new OEM GM connector, $75.00 from my local dealership...couldn't believe the price. Found it on Amazon for $32.00 with Prime shipping.:cool:


AC Delco PT2180 GM OEM Mobile Telephone Microphone Pigtail GM part #88988371

AC Delco PT2180.jpg


Glad you were able to find the part you needed. Now be careful putting it back together. :lol::lol:

 
Glad you were able to find the part you needed. Now be careful putting it back together. :lol::lol:


Cubby.....agreed, that is why I will not attemp the install....lol. :thumbsup. :cool:
 

Cadillac XLR Forums

Not a member?  Join now!  It's Free!

Learn more about Supporting Membership

Win 2 Supercharged Cadillacs!

Win both supercharged Cadillac Vs!

Supporting Vendors

Taput Tunning LLC

Top Hydraulics

Cadillac XLR Registry

Click here to enter the official Cadillac XLR and XLR-V Registry
Back
Top Bottom