Welcome to the Cadillac XLR Forums!

Roof dents

CadillacSam

Seasoned Member
Joined
Jul 7, 2017
Messages
85
Location
Germany
My XLR/V(s)
2004 Thunder Gray
Hello together.

Once I read a thread about new bolts for the trunk lid to avoid roof defects in paint,
but can't find this thread anymore to determine which GM nos to order.
Can anyone help me with this?

Thanks,
Sammy
 
What I remember reading was that the common fix was to use a Dremel type tool to grind down the offending bolt
 
i did mine, i'll snap a picture.
dremel off both offending bolts that stick out.
cover the now cut bolt (and its base nut) with little rubber nubs, glued on.
stack some small round chair leg pads (the felt sticky kind) to add a soft bumper lower down than the now covered bolts.
a picture is worth a thousand words. i'll get some...

also note, when the top is down, it should be locked down tight, towards the rear and the front. it has locking hooks.
if it is loose, aka will bounce when stowed in the trunk, its not latched properly.
i found mine not latched properly once, but every time since then it has always been tight.
i think it only takes once for the uncut bolts to ding the roof. mine has a tiny ding, was there when i bought it.
touch up job is good enough for now.
if i ever get any paint work done i'll have them do a better job. not worth repainting for that tiny chip.
 
Last edited:
i did mine, i'll snap a picture.
dremel off both offending bolts that stick out.
cover the now cut bolt (and its base nut) with little rubber nubs, glued on.
stack some small round chair leg pads (the felt sticky kind) to add a soft bumper lower down than the now covered bolts.
a picture is worth a thousand words. i'll get some...

also note, when the top is down, it should be locked down tight, towards the rear and the front. it has locking hooks.
if it is loose, aka will bounce when stowed in the trunk, its not latched properly.
i found mine not latched properly once, but every time since then it has always been tight.
i think it only takes once for the uncut bolts to ding the roof. mine has a tiny ding, was there when i bought it.
touch up job is good enough for now.
if i ever get any paint work done i'll have them do a better job. not worth repainting for that tiny chip.

Thanks, I will wait for your pictures.
Did you only cut the bolts?
 
yes i just shaved the bolts off flush with the nut.
just make sure you are doing the right ones. no point cutting off anything extra.
lay down a towel first and try to catch all the metal shavings and the little bolt tip that drops.
with a dremel it goes very easy. and can polish smooth any burr that might be left once cut off.
i dont recall having to do that, the high speed dremel did a very nice job.
i'll get some pics tonight after work, try to post tomorrow...
 
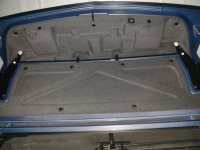
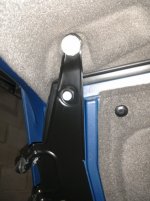
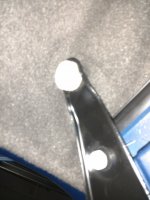
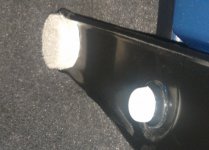
A few pics , underside of trunk lid. Top in up position. sorry the flash was burning out the image. The small white part is where I cut off the bolt, and covered with a little rubber cap. The large white circle is two felt furniture foot pads stuck together and stuck into that round indent. The felt pads were common size, can measure to be sure.I think either 3/4 or 1 inch diameter. Easier to work on when top is down. These pics are with top up.
IMG_20171009_013017_000.jpgIMG_20171009_012840_155.jpgIMG_20171009_012612_969.jpg
 
Last edited:
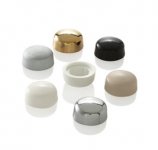
The little rubber cap I used was a hex nut cap, something like this. It fit well on the nut. But a drop of glue was easy insurance. You could probably just dremel off the bolt, and skip the rest. But I wanted to add some protection in case the top was loose ever again.didn't want paint bouncing against metal. The felt pad is now the first thing that will make contact.
 

Attachments

  • Hex-Caps-large02.jpg
    Hex-Caps-large02.jpg
    9.6 KB · Views: 565
Last edited:
Thanks a lot. I've seen some XLRs with 4 dents on the roof when I was looking for mine.
That would be the four screws I see on your picture?
When I open the cap link, I see a screw... Is this the wrong one?

The little rubber cap I used was a hex nut cap, something like this. It fit well on the nut. But a drop of glue was easy insurance. You could probably just dremel off the bolt, and skip the rest. But I wanted to add some protection in case the top was loose ever again.didn't want paint bouncing against metal. The felt pad is now the first thing that will make contact.
 
IMG_20171009_013017_000.jpg
EDIT, IMAGE IS WRONG, LOWER TWO CIRCLES ARE NOT LOCATIONS OF BOLTS TO CUT OFF, THEY ARE FURTHER OUTBOARD. SEE UPDATED PICTURE!
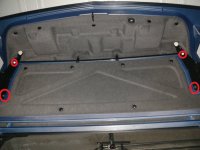
without looking at my car, my guess is the 4 bolts you need to cut off are the 4 red circles. the upper two were the only ones i had marks in the roof to reference , so i did not cut the lower bolts (lower red circles)
if my lower red circles are in the wrong location, i am sorry, i havent looked at my trunk to verify. i know there are 4 sharp bolts sticking out of that bracket.
i only cut off the two top ones.
 
Last edited:
i dont know what link you are referring to, i only posted 3 pictures from inside my trunk. and one picture of hex caps.
what screws do you refer to ?
 
I meant this Amazon link here: hex nut cap

The little rubber cap I used was a hex nut cap, something like this. It fit well on the nut. But a drop of glue was easy insurance. You could probably just dremel off the bolt, and skip the rest. But I wanted to add some protection in case the top was loose ever again.didn't want paint bouncing against metal. The felt pad is now the first thing that will make contact.
 
Great, thanks a lot.
The white dots are the rubber covers?

View attachment 7413without looking at my car, my guess is the 4 bolts you need to cut off are the 4 red circles. the upper two were the only ones i had marks in the roof to reference , so i did not cut the lower bolts (lower red circles)
if my lower red circles are in the wrong location, i am sorry, i havent looked at my trunk to verify. i know there are 4 sharp bolts sticking out of that bracket.
i only cut off the two top ones.
 
two white dots are rubber covers,
the larger white (tan) circles are the furniture pads , as additional bumpers to prevent metal to paint contact.
 
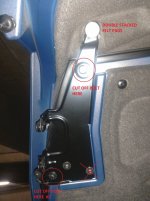
better pic ? see how the two self sticking felt pads are stacked up in the round part. they are 1 inch diameter felt pads.
see how the rubber cap is very low profile, does not add much height to the nut it is glued to. in the end the rubber cap isnt necessary, as the felt pads are now higher than the cut off bolt/nut. if roof was bouncing, it would rub against the felt pad first.
zoom.jpg
 
ONE MORE PICTURE:)
lower bolt locations are actually farther outboard than in the original pic i had posted.
i only cut off the upper bolts, i never had any roof damage from the lower bolts.
someone can confirm that they had roof marking from these lower bolts, #2 in the picture,
and that i have identified the correct locations.
my guess would be some additional felt pads near the lower bolts#2 in the pic would add additional protection.
once the bolts are cut off...
BOLT LOCATIONS.jpg
 
furniture pads 1 inch at home depot $5.45 for 48 of them. can get them anywhere
self adhesive
pads.jpg
 
Great idea furniture pads.
Thanks a lot, I will start the next days. :)

ONE MORE PICTURE:)
lower bolt locations are actually farther outboard than in the original pic i had posted.
i only cut off the upper bolts, i never had any roof damage from the lower bolts.
someone can confirm that they had roof marking from these lower bolts, #2 in the picture,
and that i have identified the correct locations.
my guess would be some additional felt pads near the lower bolts#2 in the pic would add additional protection.
once the bolts are cut off...
View attachment 7420
 
top won't lock down

Anybody else have this problem and found the fix? As the top folds into the trunk, it's supposed to lock into the crossbar at the rear. Mine doesn't seem to go down all the way without a push...then the latches will catch the holes. Pretty complicated set-up!
 
May have to have a relearn done on your top if it is not storing properly. Dealer should be able to do it or if you have a tech II, you can do it.


Anybody else have this problem and found the fix? As the top folds into the trunk, it's supposed to lock into the crossbar at the rear. Mine doesn't seem to go down all the way without a push...then the latches will catch the holes. Pretty complicated set-up!
 
Is it easy doing it with Tech II?
Thought about buying this used on Ebay.
Are they all the same or do I have to look for special options?
What is a good price for these?

May have to have a relearn done on your top if it is not storing properly. Dealer should be able to do it or if you have a tech II, you can do it.
 

Cadillac XLR Forums

Not a member?  Join now!  It's Free!

Learn more about Supporting Membership

Win 2 Supercharged Cadillacs!

Win both supercharged Cadillac Vs!

Supporting Vendors

Taput Tunning LLC

Top Hydraulics

Cadillac XLR Registry

Click here to enter the official Cadillac XLR and XLR-V Registry
Back
Top Bottom