Welcome to the Cadillac XLR Forums!

Replaced Radio/Navigation unit in my 2009

@geepapa:
Yes, I would be interested as to how the camera wires would be run as well. Looking at the door sill plates, I cannot see how they get removed (unless pull up with clips, but will they break then??). Maybe wires could be run somehow thru console and into truck area, as the back part of console (storage compartment) can be removed to get to some of the top mechanism, so maybe then the wires could be run that way and under the carpet in trunk.

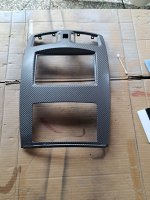
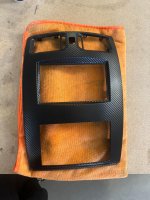
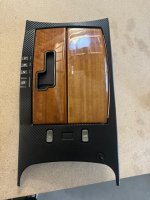
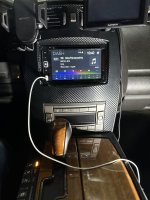
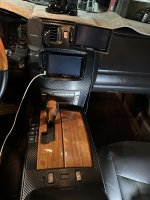
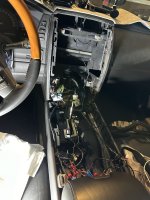
Looking at Hal's old stereo and cover, it looks like once that cover is off the front, it is easy to get to stereo to unbolt and hook up a new one. I am just leery of prying off covers and having clips break, especially ones you may not be able to get anymore!
 
As to the radio replacement, I purchased my new deck from Best Buy and their geeks installed it. You need to buy a replacement panel (that does not have the wood grain at all) to attach the the radio to. My problem is not running wires, it is after you get to the trunk where to mount the camera? Normal is somewhere around the license plate, but our plates are mounted to the trunk, so that is where running a cable or wire becomes too tricky for professionals to tackle here in Montana.
 
If you can get the wires to the trunk area and get them out to license plate area (via a little hole in bumper cover possibly) then I would suggest a license plate frame that has a camera mount built into it.
I did this for my 2001 GMC truck, and it works very nice. No need to mount camera anywhere, as it is built into the frame.
Crutchfield has a lot of these and is where I got both stereos and backup cameras for my truck and 67 Nova.
Maybe next year will try updating the XLR.
The replacement panel over your new stereo is from Metra most likely and is ABS plastic.
I believe you may be able to find a vinyl wrap place that could possibly wrap it to match the woodgrain or interior color. Or just paint it to match interior color.
 
As to the radio replacement, I purchased my new deck from Best Buy and their geeks installed it. You need to buy a replacement panel (that does not have the wood grain at all) to attach the the radio to. My problem is not running wires, it is after you get to the trunk where to mount the camera? Normal is somewhere around the license plate, but our plates are mounted to the trunk, so that is where running a cable or wire becomes too tricky for professionals to tackle here in Montana.
I ran the wiring for rear camera down drivers side tucked under the door trim/carpet edge. It’s open into the truck past the door opening. Than ran along the wire bundle along drivers side of the trunk to the truck lid hinge. Up the hinge following the factory wire bundle. Bit of work but you can run it in the same mounts as factory wiring than to license plate area. I used a video cable that included a separate wire in it and used it to connect the the backup lights for a reverse signal to activate the camera on the display.
 
@Fireduck69 :
Good info, thanks.
Just wondering if you pulled the “sill plate” to run wires under carpet to back trunk area?
Did you pull an interior panel behind the seat as well?
Looks like the sill plates are very tight to floor/jamb and may be hard to pry up without breaking?
I can see once you get to trunk area how it would not be too hard to run wires with original harness.
The metal sill plates are just decorative, there is nothing under them. I just tucked it under the plastic trim by running it along the carpet and than tucking it up under the plastic trim. you can pull the bottom corner of the rear interior panel out enough to run the wire through without removing it.
hope that makes sens, it’s easier that it sounds.
 
Thanks Fireduck69, makes sense.
Did you use the Metra adapters for the wiring harness?
What brand system did you put in and does it work well with FM reception?

I have a Kenwood and a Jensen I retrofit in other vehicles and FM reception is marginal compared to my factory XLR and new Malibu stereos.
 
I did the install back in 2014. The metra kit wasn’t available back than. I installed a pioneer nav7200 something. Was their top of the line back then. FM works really well.
 
A work in progress, I'll be installing a Pioneer unit and have the Metra kit and wire harness from Crutchfield's. The matte black finish of the center console wasn't going to cut it so after considerable thought I decided to go with Meteorite Dark Gray Carbon Fiber vinyl wrap. Not a perfect match as it's a bit darker than the OEM finish. Bought enough to do the floor console if the mismatch bothers me.
 

Attachments

  • cenconcfwrap1.jpg
    cenconcfwrap1.jpg
    2.3 MB · Views: 40
@Festus :
Looks nice! Please share some other photos once you get it done and let us know what Pioneer unit you put in and how it works.
I may tackle this next year on mine.
Thanks
 
@Festus :
Looks nice! Please share some other photos once you get it done and let us know what Pioneer unit you put in and how it works.
I may tackle this next year on mine.
Thanks
Thanks! I'm installing the AVIC-W8600NEX and ND-BC8 (backup cam). This is the latest version of the same unit I did in my wife's '93 Sevelle STS. I'll post up as the work progresses, waiting for a stretch of a few days of nice weather.
 
hello for my part I took the next step by ordering the complete metra kit from Rockauto, then ordered a Pioneer CD/DVD, DAB radio, Apple carplay. Before the change, put a carbon Vinyl on the metra face and the console. installation approximately 5 hours with installation of the DAB antenna, and pre-wiring for the rear camera! This is the result!
 

Attachments

  • 08d4db49-0eda-4775-aa88-945d1682f923.jpeg
    08d4db49-0eda-4775-aa88-945d1682f923.jpeg
    292.2 KB · Views: 30
  • d83ed4e8-eeeb-4f14-ad06-25e322485a24.jpeg
    d83ed4e8-eeeb-4f14-ad06-25e322485a24.jpeg
    248.2 KB · Views: 43
  • IMG_6057.jpeg
    IMG_6057.jpeg
    1.6 MB · Views: 36
  • IMG_6016.jpeg
    IMG_6016.jpeg
    1.7 MB · Views: 44
Le tout avec les commandes au volant fonctionnel et l’ampli fonctionel ! Je suis content du résultat !
Merci à tous pour les nombreux conseils sur le forum !
 
@Luluone: Thanks for info and pics, good to know!
For you and others doing this yourself, did you have any problems getting the face plate or console covers off without clips breaking? I am concerned about taking these off and having the clips or plastic break. Any special tools needed, or just pry off carefully with putty knife of plastic pry tool?

Also, looks like once the front/vertical faceplate is off, most all wiring and access to swap units can be done?
The clips are solid and do not break easily, however the fixings on the console on the fascia side of the car radio are more fragile and you must be careful when removing them. Otherwise there is no problem if you work carefully.
 
@Luluone: Thanks for info and pics, good to know!
For you and others doing this yourself, did you have any problems getting the face plate or console covers off without clips breaking? I am concerned about taking these off and having the clips or plastic break. Any special tools needed, or just pry off carefully with putty knife of plastic pry tool?

Also, looks like once the front/vertical faceplate is off, most all wiring and access to swap units can be done?
 

Attachments

  • IMG_6013.jpeg
    IMG_6013.jpeg
    1.6 MB · Views: 31
  • IMG_6015.jpeg
    IMG_6015.jpeg
    1.6 MB · Views: 34
@Luluone: Thanks for info and pics, good to know!
For you and others doing this yourself, did you have any problems getting the face plate or console covers off without clips breaking? I am concerned about taking these off and having the clips or plastic break. Any special tools needed, or just pry off carefully with putty knife of plastic pry tool?

Also, looks like once the front/vertical faceplate is off, most all wiring and access to swap units can be done?
These are my tools, highly recommend for this project. Also, the tools I used for the vinyl wrapping process. The squeegee has a felt edge to prevent scratches and use a fresh blade in the Exacto, or knife of choice. I also found the low setting on the heat gun more than adequate.
 

Attachments

  • pry bars.jpg
    pry bars.jpg
    2.1 MB · Views: 25
  • useful tools.jpg
    useful tools.jpg
    2.2 MB · Views: 20

Cadillac XLR Forums

Not a member?  Join now!  It's Free!

Learn more about Supporting Membership

Win 2 Supercharged Cadillacs!

Win both supercharged Cadillac Vs!

Supporting Vendors

Taput Tunning LLC

Top Hydraulics

Cadillac XLR Registry

Click here to enter the official Cadillac XLR and XLR-V Registry
Back
Top Bottom