jjsea55
Seasoned Member
- Joined
- Mar 26, 2011
- Messages
- 285
- Location
- Pensacola, Florida
- My XLR/V(s)
- 2006 Black Raven XLR-V, Shale interior
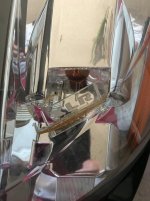
I just happened to notice this last night when in my garage. The amber light diffuser with the engraved "XLR" on top had come unclipped on one side (inside) of my driver side assembly. I honestly didn't know that it was a separate piece that simply clipped into a slot on each respective side of the tunnel as it slid into position.
I've upgraded my head lamps and all of the other lamps to LED units... EXCEPT the amber running lamps... for some reason I couldn't locate the LED replacements at the time. Of course, I now have some "krazing" on each of the diffusers (worse on passenger side).
If memory serves, all of the bulb replacements were effected from the back of the assembly. I seem to remember reading that the inner assembly is sealed and unaccessible. Do I have options here to get my diffuser back into place? Reckon what may have caused this to happen? The clips on both sides look good, but that's looking from the top through the lens.
I've attached a photo (hope it makes the post)... for viewing. Would be nice if only this diffuser unit could be replicated and new units could be inserted to replace those that have been affected by the heat. Appreciate any input or observations anyone may have regarding this issue.
Thanks!
 ) . It all worked out fine and he used some kind of silicone to put it back together . It worked but it was stressful to watch.


