Welcome to the Cadillac XLR Forums!

Rear swaybar parts list '04-'09

Swaybar Installation - The Post Mortem

I'll check tomorrow and see if I still have them; under the weather today with a cold/bug. If I can't find them, I'll check my service manual, and go that route.

UPDATE. Well, I just HAD to try to get the anti-sway bar installed, so I gave it a whirl. I don't have the luxury of a lift in my garage, so I broke out the hockey pucks I had converted into jack pads, and got after it while my wife was off to the store. The makeshift pads worked fine, and soon the wheels were off the floor, secured also by an olde screw jack, 'cuz my jack stands wouldn't fit. [Note to self: get some decent jack stands.] After inventorying all the parts (they were all there, except for the afore-mentioned instructions) and laying this all out, I got going.

The 1st thing I discovered is that I was missing an 18mm deep socket. How? Where? Dunno. :confused: Had to use a 3/4", which was loose, but got the nuts off that A-frame mounting bolt OK. AOK so far. There was no lube at all on the "isolator", so I gave it some silicon spray, and I slipped the isolators on the bar just fine. With the help of some more spray and a big rubber hammer, I got the clamps over the rubber isolators and put the bar on the car, loosely. I had to refer to the pic's posted here to confirm how the links went on. Thought I'd just put them on loosely, do a final adjust and torque 'em down. NO WAY.

:banghead:


The nuts for the links only thread on about half way, and then they get really hard to move, and the link "bolt" fittings turn. It looked like a thin 18mm open end wrench would stop that, so I tried that. No joy there; after a few more turns [not enough], the little backing part of that "bolt" spun on the wrench, and wouldn't hold after that. My only recourse at that point was one I deplore: Vice Grips. So, I put out my old faithful set I've had since the '60's and it did the job and I got the nuts [finally, after many "blue" words and about an hour] torqued to the spec's you gave me.

Lessons learned:

1) This job would be trivial for a dealer tech. They'd have the lift and probably the directions and the special 18mm backing wrench needed to keep the link "bolts" from turning. Really should not take them over 0.3 hours for the installation. :rolleyes:

2) Don't still be using the whole garage when your wife gets back home, and cause her to have to "donkey" all the groceries from the driveway. :shedevil

Now to give QUIK AG a test drive a little later. :)

Tim
 
UPDATE. Well, I just HAD to try to get the anti-sway bar installed, so I gave it a whirl. I don't have the luxury of a lift in my garage, so I broke out the hockey pucks I had converted into jack pads, and got after it while my wife was off to the store. The makeshift pads worked fine, and soon the wheels were off the floor, secured also by an olde screw jack, 'cuz my jack stands wouldn't fit. [Note to self: get some decent jack stands.] After inventorying all the parts (they were all there, except for the afore-mentioned instructions) and laying this all out, I got going.

The 1st thing I discovered is that I was missing an 18mm deep socket. How? Where? Dunno. :confused: Had to use a 3/4", which was loose, but got the nuts off that A-frame mounting bolt OK. AOK so far. There was no lube at all on the "isolator", so I gave it some silicon spray, and I slipped the isolators on the bar just fine. With the help of some more spray and a big rubber hammer, I got the clamps over the rubber isolators and put the bar on the car, loosely. I had to refer to the pic's posted here to confirm how the links went on. Thought I'd just put them on loosely, do a final adjust and torque 'em down. NO WAY.

:banghead:


The nuts for the links only thread on about half way, and then they get really hard to move, and the link "bolt" fittings turn. It looked like a thin 18mm open end wrench would stop that, so I tried that. No joy there; after a few more turns [not enough], the little backing part of that "bolt" spun on the wrench, and wouldn't hold after that. My only recourse at that point was one I deplore: Vice Grips. So, I put out my old faithful set I've had since the '60's and it did the job and I got the nuts [finally, after many "blue" words and about an hour] torqued to the spec's you gave me.

Lessons learned:

1) This job would be trivial for a dealer tech. They'd have the lift and probably the directions and the special 18mm backing wrench needed to keep the link "bolts" from turning. Really should not take them over 0.3 hours for the installation. :rolleyes:

2) Don't still be using the whole garage when your wife gets back home, and cause her to have to "donkey" all the groceries from the driveway. :shedevil

Now to give QUIK AG a test drive a little later. :)

Tim

I installed one on XLRATING's XLR (Beauty) that I purchased from gmpartsdirect.com it didn't come with instructions either. I used pictures from You Tube to see how it was installed. I was lucky that all the moons were lined up because I didn't have any problems execpt a skinned knuckle.:willy_nilly:

Mike
 
UPDATE. Well, I just HAD to try to get the anti-sway bar installed, so I gave it a whirl. I don't have the luxury of a lift in my garage, so I broke out the hockey pucks I had converted into jack pads, and got after it while my wife was off to the store. The makeshift pads worked fine, and soon the wheels were off the floor, secured also by an olde screw jack, 'cuz my jack stands wouldn't fit. [Note to self: get some decent jack stands.] After inventorying all the parts (they were all there, except for the afore-mentioned instructions) and laying this all out, I got going.

The 1st thing I discovered is that I was missing an 18mm deep socket. How? Where? Dunno. :confused: Had to use a 3/4", which was loose, but got the nuts off that A-frame mounting bolt OK. AOK so far. There was no lube at all on the "isolator", so I gave it some silicon spray, and I slipped the isolators on the bar just fine. With the help of some more spray and a big rubber hammer, I got the clamps over the rubber isolators and put the bar on the car, loosely. I had to refer to the pic's posted here to confirm how the links went on. Thought I'd just put them on loosely, do a final adjust and torque 'em down. NO WAY.

:banghead:


The nuts for the links only thread on about half way, and then they get really hard to move, and the link "bolt" fittings turn. It looked like a thin 18mm open end wrench would stop that, so I tried that. No joy there; after a few more turns [not enough], the little backing part of that "bolt" spun on the wrench, and wouldn't hold after that. My only recourse at that point was one I deplore: Vice Grips. So, I put out my old faithful set I've had since the '60's and it did the job and I got the nuts [finally, after many "blue" words and about an hour] torqued to the spec's you gave me.

Lessons learned:

1) This job would be trivial for a dealer tech. They'd have the lift and probably the directions and the special 18mm backing wrench needed to keep the link "bolts" from turning. Really should not take them over 0.3 hours for the installation. :rolleyes:

2) Don't still be using the whole garage when your wife gets back home, and cause her to have to "donkey" all the groceries from the driveway. :shedevil

Now to give QUIK AG a test drive a little later. :)

Tim

Glad you were able to "get er done"...
 
Kludge...

Yeah, Rod, as Larry the Cable Guy says, I "got 'er done", but I'm not particularly proud of how it went. Using a 50-year old set of Vice Grips on a car like the XLR is just nasty. I'm glad the little rubber boots cover up the scars from that, but I just didn't have another tool that would work to keep those threaded parts of the links from turning. :mad:

Kind of reminds me of a "Red Green" project. :chuckle

Tim

For those not of the Northern US persuasion, Red Green is a Canadian comedian who has a TV show that just cracks me up. Everything he fixes entails the liberal use of duct tape and baling wire, mostly duct tape.

I have entire series of Red Green DVD's and they are hilarious. :laugh:
 
If I remember correctly, the link bolt has a Torx head (or star type head). I can't remember what size, but it makes the job a lot easier!:lol:


My Cadillac dealer has been really good to deal with and has a very good XLR specific technician. As a result, I try to do my best to support them, so I purchased my parts from them and had the installation done there.

The labor charge was only for 1 hour and I believe that was fair. It seemed a bargain since I don't have a lift (though I do have a very clean garage). I know a lot of folks are enthusiastic "Do it yourself" people and I can appreciate that as well.

I really had the opportunity to appreciate the improvement that the anti-swaybar made when we drove the Blue Ridge Parkway and Skyline Drive on our way up to Pennsylvania this past June.
 
Separation Anxiety

My Cadillac dealer has been really good to deal with and has a very good XLR specific technician. As a result, I try to do my best to support them, so I purchased my parts from them and had the installation done there.

The labor charge was only for 1 hour and I believe that was fair. It seemed a bargain since I don't have a lift (though I do have a very clean garage). I know a lot of folks are enthusiastic "Do it yourself" people and I can appreciate that as well.

I really had the opportunity to appreciate the improvement that the anti-swaybar made when we drove the Blue Ridge Parkway and Skyline Drive on our way up to Pennsylvania this past June.

I try to do most of the work myself because every time I drop off the XLR I find myself having SEPARATION ANXIETY!!
:willy_nilly:
 

I try to do most of the work myself because every time I drop off the XLR I find myself having SEPARATION ANXIETY!!
:willy_nilly:

Try NOT driving her for about 6 months... talk about separation anxiety!!! But... Love her EVEN MORE come SPRING!!!
 
Try NOT driving her for about 6 months... talk about separation anxiety!!! But... Love her EVEN MORE come SPRING!!!

You should have less separation anxiety if you get that Arizona retirement home . . . :D
 
question for those of you who did it yourself.
it looks like the clamp and insulator boot utilize a bolt into the threaded upper hole, the one covered with tape.
for the lower hole, it is an existing nut and bolt? the nut needs to be removed, slip on the clamp, and reinstall the nut?
so the clamp is flush to the frame. we dont slip the clamp over top of the old nut, and add another nut on top ??
i know that sounds stupid, but rather ask now than when i'm under the car:)
 
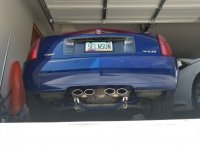
You have to remove both existing bolts and use them to install the clamps (plus two additional bolts / remove also black tape). Check out the picture in my garage that shows the installed swaybar. Hope this helps you!

Pete

question for those of you who did it yourself.
it looks like the clamp and insulator boot utilize a bolt into the threaded upper hole, the one covered with tape.
for the lower hole, it is an existing nut and bolt? the nut needs to be removed, slip on the clamp, and reinstall the nut?
so the clamp is flush to the frame. we dont slip the clamp over top of the old nut, and add another nut on top ??
i know that sounds stupid, but rather ask now than when i'm under the car:)
 
Z06 Rear Sway Bar

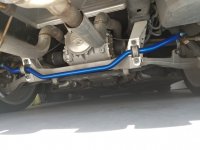
I just finished installing a rear sway bar on the XLR & I have to say "WOW!! What a difference!!!" I purchased a used one off of an 06 Z06, cleaned it up, painted it, lubed the bushings & bolted her up. It only took about 15 minutes to install! Fortunately, I have the right tools & as you can see, the mufflers weren't in the way! :) The new Varex adjustable tone/volume mufflers go on tomorrow!:cool:
Sway Bar 2a.jpgSway Bar1a.jpg
 
Rear Sway bar

Bruce ,
Can you maybe tell me how expensive a job this is ?
At a Cadillac or Chevy Dealer for ordering and/or installing ?
Thanks, Brad


QUOTE=Cadillac Tech;3273]Part #
15806422 shaft/swaybar

11516078 nut (4)

15907003 link (2)

11515775 bolt (2)

10317560 insulator (2)

15142776 clamp (2)

Bruce :)[/QUOTE]
 
around 150$ . Depends on which bar you get .I think the 17mm is pretty standard. I went with the 19mm and they make a 21 and a 25mm . which gets expensive and is overkill. Each bar has its on set of insulators for the bar size. I watch ebay and can get a good used one with links usually under 100$ Vette guys take off the 17mm to upgrade but I think that is all that is needed
 
Thanks. A Cadillac parts and accessories place in N.J. advertises a whole package with sway bar, links, brackets, nuts and bolts for $240....is that good being it's the whole kit.
Will Cadillac install for an hour's labor ?
Or Chevy dealer used to Corvette ?
Does it ride harder or just less lean.
Test drove it again today but on the highway as well and for an hour ride....seems as new...love it and bought it...picking up on Monday.
 
if tis big daddy ,he just buys it for the same price you can get it at the dealer and marks it up about 80$ for profit. Its really simple to install. A performance tire store that does alignments most likely would be an easy bet to install it. Dealer may not install unless they run the parts thru their parts dept for a full markup. It takes less than an hour to install. There is a piece of tape over the bolt hole used and just remove a lower nut and slide the mount on it. then the two links. Does not change your normal straight line ride. Its just when you turn into a curve the car stays flat instead of leaning .
 

Cadillac XLR Forums

Not a member?  Join now!  It's Free!

Learn more about Supporting Membership

Win 2 Supercharged Cadillacs!

Win both supercharged Cadillac Vs!

Supporting Vendors

Taput Tunning LLC

Top Hydraulics

Cadillac XLR Registry

Click here to enter the official Cadillac XLR and XLR-V Registry
Back
Top Bottom